> ## Documentation Index
> Fetch the complete documentation index at: https://docs.rime.ai/llms.txt
> Use this file to discover all available pages before exploring further.
# Quickstart
> Get Rime running on-prem in your environment.
On-prem is now **public and generally available!** For more information regarding access to Docker images and pricing info, reach out to [help@rime.ai](mailto:help@rime.ai).
# Introduction
## Why on-premises?
Deploying on-premises offers several advantages over using cloud APIs over a public network. One of the main benefits is speed; by hosting the services locally, you can significantly reduce network latency, resulting in faster system responses and data processing.
## Security
With an on-premises deployment, all sensitive data remains within your corporate network, ensuring enhanced security as it is not transmitted over the Internet. This setup helps in complying with strict data privacy and protection regulations.
## Performance
### Latency
* **Coda:** Available on-premises. Setup details and performance numbers coming in a follow-up release.
* **Mist v2:** Our tests have shown median latency of **175ms** with randomly generated sentences between 40 and 50 characters on A10Gs and similar GPUs.
* **Arcana:** See [performance tuning](/docs/on-prem/performance#metrics).
## Components
 # Prerequisites
## Hardware requirements
* GPU
* For Mist
* NVIDIA T4, L4, A10, or higher
* For Arcana
* NVIDIA A100, H100 MIG `3g.40gb`, or higher
* Storage
* 50 GB storage
* CPU
* 8 vCPUs
* Memory requirements
* 32 GiB
## Software requirements
* Supported Linux Distributions
* Debian 12 (`bookworm`), x86\_64
* Ubuntu Server 24.04 (`jammy`), x86\_64
* NVIDIA drivers
* Minimum: `525.60.13`
* Recommended: `570.133.20` or higher
* Docker
* NVIDIA Container Toolkit
### Installations
#### NVIDIA drivers
Follow [https://www.nvidia.com/en-us/drivers](https://www.nvidia.com/en-us/drivers) to install the latest NVIDIA drivers, or use the following instructions on Debian-based systems:
```bash NVIDIA Driver Installation (Debian-based) theme={null}
# Update packages
sudo apt-get update
# Install basic toolchain and kernel headers
sudo apt-get install -y gcc make wget linux-headers-$(uname -r)
# Download and install the NVIDIA driver.
NVIDIA_DRIVER_VERSION=580.95.05
NVIDIA_DRIVER_PATH=/opt/NVIDIA-Linux-x86_64-${NVIDIA_DRIVER_VERSION}.run
sudo rm -f "${NVIDIA_DRIVER_PATH}"
sudo wget "https://us.download.nvidia.com/tesla/${NVIDIA_DRIVER_VERSION}/NVIDIA-Linux-x86_64-${NVIDIA_DRIVER_VERSION}.run" -O "${NVIDIA_DRIVER_PATH}"
sudo chmod +x "${NVIDIA_DRIVER_PATH}"
sudo "${NVIDIA_DRIVER_PATH}" --silent --no-questions
```
#### Docker
Follow [https://docs.docker.com/engine/install](https://docs.docker.com/engine/install) to install Docker on your system.
Optionally, add the current user to the `docker` group for convenience: [https://docs.docker.com/engine/install/linux-postinstall](https://docs.docker.com/engine/install/linux-postinstall).
The code snippets below assume that you can run `docker` as the current login.
#### NVIDIA Container Toolkit
Follow [https://docs.nvidia.com/datacenter/cloud-native/container-toolkit/latest/install-guide.html](https://docs.nvidia.com/datacenter/cloud-native/container-toolkit/latest/install-guide.html) to install the NVIDIA Container Toolkit.
Note that you should follow both the **Installation** and the **Configuration** sections.
#### Verification
To verify that you have all the prerequisites installed, run the following command:
```bash Verify Prerequisites theme={null}
docker run --rm --gpus all nvidia/cuda:12.8.1-base-ubi9 nvidia-smi
```
You should see your GPU listed in the output, alongside the driver version and CUDA version.
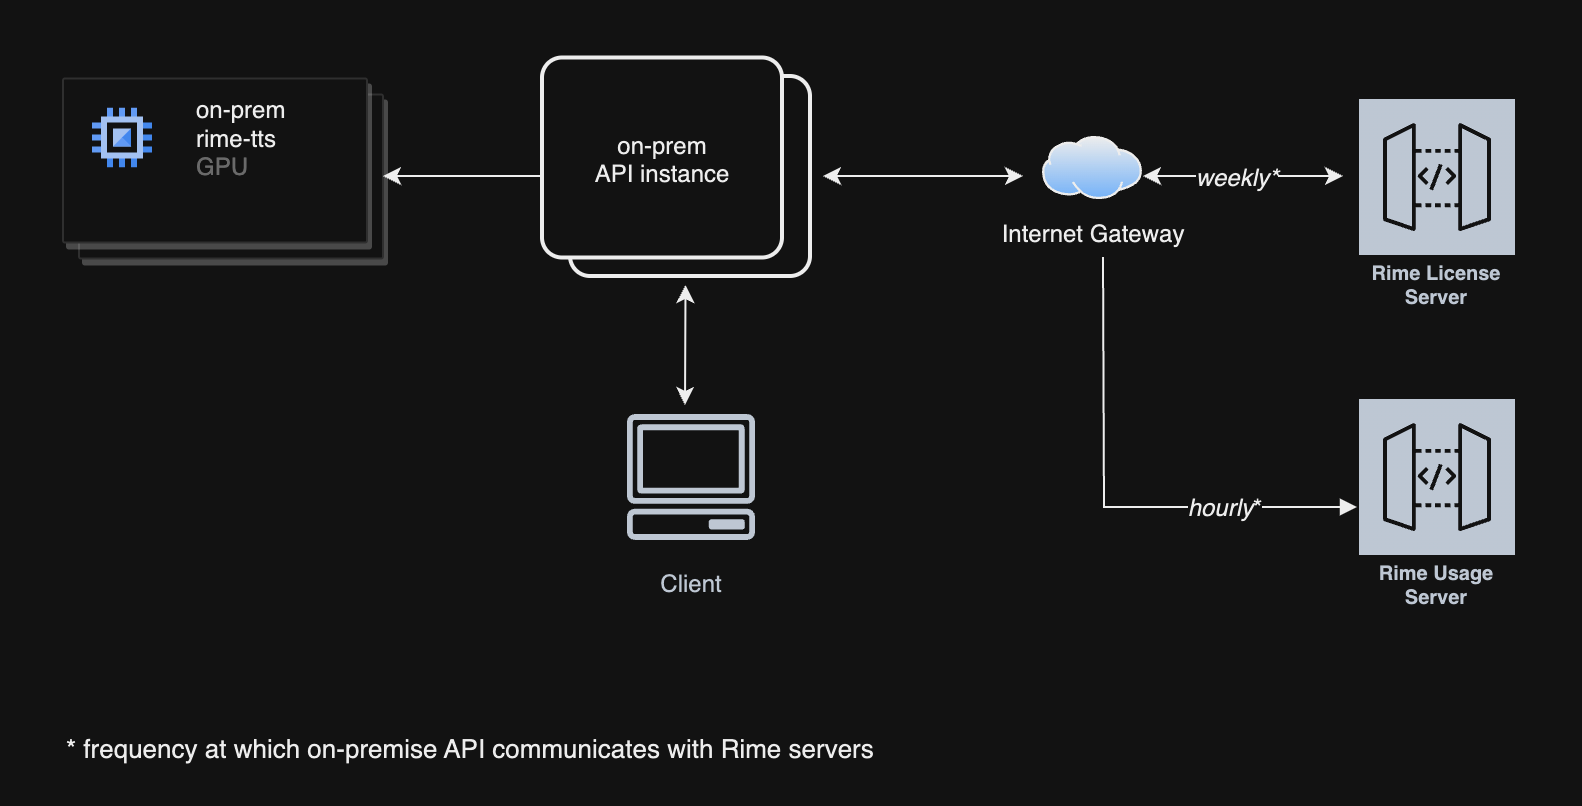
## Firewall requirements
The Rime API instance will listen on port 8000 for HTTP traffic, and on port 8001 for WebSocket traffic.
You will also need to allow the following outbound traffic in your firewall rules:
* `https://optimize.rime.ai/usage`: registers on-prem usage with our servers.
* `https://optimize.rime.ai/license`: verifies that your on-prem license is active.
* `us-docker.pkg.dev` on port 443: container image registry.
# Self-service licensing and credentials
## API key Generation
Refer to our [user interface dashboard](https://app.rime.ai) to generate the necessary keys and credentials for authenticating and authorizing the deployment and use of our services.
# Deployment
The deployment consists of two services, each powered by a container image:
* **API service:** responsible for handling the HTTP and WebSocket requests, and for verifying the license. It serves as a proxy to the TTS service.
* **TTS service:** responsible for model inference.
There is a 1:1 relationship between the API service and the TTS service: for each TTS model, you will need a corresponding API service. Multiple pairs of API and TTS services can be deployed on the same machine.
## Artifact Registry login
Key file to be provided by Rime.
```bash Log in to Artifact Registry theme={null}
cat KEY-FILE | docker login -u _json_key --password-stdin https://us-docker.pkg.dev
```
## Container images
### TTS service
#### Arcana
The Arcana images can be found at `us-docker.pkg.dev/rime-labs/arcana/v2/:`.
* The support languages are: `en`, `es`, `fr`, `de`, `si`.
* The latest version is `20260420`.
#### Arcana v3 (multilingual)
The Arcana v3 images can be found at `us-docker.pkg.dev/rime-labs/arcana/v3/ennea:`.
* The support languages are: `en`, `es`, `fr`, `pt`, `de`, `ja`, `ta`, `si`, `he`.
* The latest version is `20260420`.
For Arcana only, you can also load the engine and data packages from different containers:
* `us-docker.pkg.dev/rime-labs/engine/arcana:`
* `us-docker.pkg.dev/rime-labs/package/arcana/:`
#### Coda (multilingual)
The Coda v1 images can be found at `us-docker.pkg.dev/rime-labs/coda/v1/coda:`.
* The support languages are: `en`, `es`, `fr`, `pt`, `de`, `ja`.
* The latest version is `20260517`.
#### Mist v3 (multilingual)
The Mist v3 images can be found at `us-docker.pkg.dev/rime-labs/mist/v3/omni:`
* The support languages are: `de`, `en`, `es`, `fr`.
* The latest version is `20260420`.
### API service
The latest image version is:
* `us-docker.pkg.dev/rime-labs/api/service:20260424`
## Docker Compose configuration
A simple way of deploying on a machine is to use Docker Compose.
Create a `compose.yml` file with your editor of choice to define the services and their configurations:
```yaml compose.yml theme={null}
version: '3.8'
services:
api:
image: us-docker.pkg.dev/rime-labs/api/service:
depends_on:
- model
ports:
- "8000:8000"
- "8002:8002" # binary websockets api
- "8003:8003" # json websockets api
restart: unless-stopped
environment:
- MODEL_URL=http://model:8080/invocations
model:
image: us-docker.pkg.dev/rime-labs///:
deploy:
resources:
reservations:
devices:
- driver: nvidia
capabilities: [gpu]
count: all
restart: unless-stopped
```
> When running on Kubernetes, ensure that `MODEL_URL` points to `http://0.0.0.0:8080/invocations` instead of the Docker Compose service name.
### Multi-model backend
If you want to serve multiple Arcana languages via a single API instance, you can create a `compose.yml` like the following:
```yaml compose.yml theme={null}
services:
en-api: us-docker.pkg.dev/rime-labs/api/service:
image:
depends_on:
- en-model
- es-model
ports:
- "8000:8000"
- "8001:8001"
- "8002:8002"
- "8003:8003"
restart: unless-stopped
environment:
- MODEL_URL=http://en-model:8080/invocations
- ARCANA_ENG_MODEL_URL=http://en-model:8080/invocations
- ARCANA_SPA_MODEL_URL=http://es-model:8080/invocations
en-model:
image: us-docker.pkg.dev/rime-labs/arcana/v2/en:
deploy:
resources:
reservations:
devices:
- driver: nvidia
capabilities: [gpu]
count: all
restart: unless-stopped
es-model:
image: us-docker.pkg.dev/rime-labs/arcana/v2/es:
deploy:
resources:
reservations:
devices:
- driver: nvidia
capabilities: [gpu]
count: all
restart: unless-stopped
```
Note that the `ARCANA_{LANG}_MODEL_URL` environment variable must point to the container running the Arcana image for that language,
but you should still point `MODEL_URL` to a default model container. The model environment variables currently supported are:
```
ARCANA_ENG_MODEL_URL
ARCANA_SPA_MODEL_URL
ARCANA_FRA_MODEL_URL
ARCANA_GER_MODEL_URL
```
The API will route to these model backends based on the request parameter lang.
### Authentication configuration
By default, callers must pass their Rime API key in every request via the `Authorization: Bearer ` header. Two additional environment variables let you configure authentication at the deployment level instead.
#### Pre-configuring the API key (`RIME_API_KEY`)
If you set `RIME_API_KEY`, the API service will use it to authenticate with the Rime license server automatically, and callers do not need to include an API key in their requests.
You can supply it as an environment variable:
```yaml compose.yml theme={null}
environment:
- MODEL_URL=http://model:8080/invocations
- RIME_API_KEY=
```
Or mount it as a secret file at `/secrets/rime_api_key` inside the container:
```yaml compose.yml theme={null}
services:
api:
image: us-docker.pkg.dev/rime-labs/api/service:
environment:
- MODEL_URL=http://model:8080/invocations
volumes:
- /run/secrets/rime_api_key:/secrets/rime_api_key:ro
```
When neither is provided, the per-request `Authorization` header pathway remains active as normal.
#### Alternate API key header (`API_KEY_HEADER`)
On platforms that intercept the `Authorization` header, set `API_KEY_HEADER` to the name of an alternate header that callers will use to pass their Rime API key:
```yaml compose.yml theme={null}
environment:
- MODEL_URL=http://model:8080/invocations
- API_KEY_HEADER=x-my-platform-rime-api-key
```
Callers then authenticate with:
```bash theme={null}
curl -H "x-my-platform-rime-api-key: " ...
```
#### Platform API key (`PLATFORM_API_KEY`)
On platforms that require authenticated inter-container requests, set `PLATFORM_API_KEY` so the API service can reach the model backend. It can also be mounted as a secret at `/secrets/platform_api_key`:
```yaml compose.yml theme={null}
environment:
- MODEL_URL=http://model:8080/invocations
- PLATFORM_API_KEY=
```
### Start Docker Compose
```bash Start Docker Compose theme={null}
docker compose up -d
```
## Deployment steps
1. **Environment setup:** Prepare your AWS environment according to the specifications required for optimal deployment.
2. **Service deployment:** Using Docker, deploy the images on your server.
3. **Networking setup:** Configure the network settings, including the Internet Gateway and port settings, to ensure connectivity and security.
4. **Licensing and authentication:** Generate and apply the necessary API key via our dashboard to start using the services.
> **Note:** Once the containers are started, expect a five-minute delay for warm-up before sending the first TTS requests.
## Additional information
* **Troubleshooting guide:** A troubleshooting guide will be provided to help resolve common issues during deployment.
* **Available voices and models:** All voices are currently available.
# Requests and response formats
## HTTP requests
**Request:**
```bash Health check theme={null}
curl http://localhost:8000/health
```
This should return:
```json theme={null}
{
"apiStatus":"ok",
"timestamp":timestamp,
"licenseStatus":"valid"/"expired-or-not-set",
"modelReachable":true/false
}
```
```bash Request example theme={null}
curl -X POST "http://localhost:8000" -H "Authorization: Bearer -H "Content-Type: application/json" -d '{
"text": "I would love to have a conversation with you. The new model is out.",
"speaker": "joy",
"modelId": "mist"
}' -o result_mist.txt
```
**Response:**
```json Response format theme={null}
{"audioContent":{"model_output":""}}
```
Sample response file: [`result.txt`](https://drive.google.com/file/d/1GW2D8pm5witYMQdKQrPvp_OW5PM0TxNj/view?usp=drive_link)
## Receiving a response in MP3 format
**Request:**
```bash Request example theme={null}
curl -X POST "http://localhost:8000" -H "Authorization: Bearer " -H "Content-Type: application/json" -H "Accept: audio/mpeg" -d '{
"text": "I would love to have a conversation with you.",
"speaker": "joy",
"modelId": "mist"
}' -o result.mp3
```
**Response:**
Sample response file: [`result.mp3`](https://drive.google.com/file/d/1iwmWB1byBXknmNvNmvB_SgBpvnU4bChJ/view?usp=sharing)
### Receiving a response in PCM (raw) format
**Request:**
```bash Request example theme={null}
curl -X POST "http://localhost:8000" -H "Authorization: Bearer " -H "Content-Type: application/json" -H "Accept: audio/L16" -d '{
"text": "I would love to have a conversation with you.",
"speaker": "joy",
"modelId": "mist"
}' -o result.pcm
```
**Response:**
Sample response file: [`result.pcm`](https://drive.google.com/file/d/1pwkGW9jCe1TN9GF5yQa6j619vc8WfjGu/view?usp=drive_link)
### WebSocket endpoints
#### JSON websockets
The JSON WebSocket endpoint compatible with both `arcana` models as well as `mist` will be served at port `8003`. For example, `ws://localhost:8003`, which will be equivalent to our \[cloud websockets-json API.
See the [arcana json websockets docs](/api-reference/arcana/websockets-json) and the [mist json websockets docs](/api-reference/endpoint/websockets-json) depending
on which model backend you have configured.
#### Non-JSON websockets
The non-JSON WebSocket endpoint will be served at port `8002`. For example, `ws://localhost:8002`, which will be equivalent to our [cloud websockets-json API](/api-reference/endpoint/websockets-json).
\`
#### Deprecated
A **deprecated** websockets endpoint will be served on port `8001` that is **only** compatible with the mist model lines, and is equivalent to our [cloud websockets-json API](/api-reference/endpoint/websockets-json).
# Prerequisites
## Hardware requirements
* GPU
* For Mist
* NVIDIA T4, L4, A10, or higher
* For Arcana
* NVIDIA A100, H100 MIG `3g.40gb`, or higher
* Storage
* 50 GB storage
* CPU
* 8 vCPUs
* Memory requirements
* 32 GiB
## Software requirements
* Supported Linux Distributions
* Debian 12 (`bookworm`), x86\_64
* Ubuntu Server 24.04 (`jammy`), x86\_64
* NVIDIA drivers
* Minimum: `525.60.13`
* Recommended: `570.133.20` or higher
* Docker
* NVIDIA Container Toolkit
### Installations
#### NVIDIA drivers
Follow [https://www.nvidia.com/en-us/drivers](https://www.nvidia.com/en-us/drivers) to install the latest NVIDIA drivers, or use the following instructions on Debian-based systems:
```bash NVIDIA Driver Installation (Debian-based) theme={null}
# Update packages
sudo apt-get update
# Install basic toolchain and kernel headers
sudo apt-get install -y gcc make wget linux-headers-$(uname -r)
# Download and install the NVIDIA driver.
NVIDIA_DRIVER_VERSION=580.95.05
NVIDIA_DRIVER_PATH=/opt/NVIDIA-Linux-x86_64-${NVIDIA_DRIVER_VERSION}.run
sudo rm -f "${NVIDIA_DRIVER_PATH}"
sudo wget "https://us.download.nvidia.com/tesla/${NVIDIA_DRIVER_VERSION}/NVIDIA-Linux-x86_64-${NVIDIA_DRIVER_VERSION}.run" -O "${NVIDIA_DRIVER_PATH}"
sudo chmod +x "${NVIDIA_DRIVER_PATH}"
sudo "${NVIDIA_DRIVER_PATH}" --silent --no-questions
```
#### Docker
Follow [https://docs.docker.com/engine/install](https://docs.docker.com/engine/install) to install Docker on your system.
Optionally, add the current user to the `docker` group for convenience: [https://docs.docker.com/engine/install/linux-postinstall](https://docs.docker.com/engine/install/linux-postinstall).
The code snippets below assume that you can run `docker` as the current login.
#### NVIDIA Container Toolkit
Follow [https://docs.nvidia.com/datacenter/cloud-native/container-toolkit/latest/install-guide.html](https://docs.nvidia.com/datacenter/cloud-native/container-toolkit/latest/install-guide.html) to install the NVIDIA Container Toolkit.
Note that you should follow both the **Installation** and the **Configuration** sections.
#### Verification
To verify that you have all the prerequisites installed, run the following command:
```bash Verify Prerequisites theme={null}
docker run --rm --gpus all nvidia/cuda:12.8.1-base-ubi9 nvidia-smi
```
You should see your GPU listed in the output, alongside the driver version and CUDA version.
## Firewall requirements
The Rime API instance will listen on port 8000 for HTTP traffic, and on port 8001 for WebSocket traffic.
You will also need to allow the following outbound traffic in your firewall rules:
* `https://optimize.rime.ai/usage`: registers on-prem usage with our servers.
* `https://optimize.rime.ai/license`: verifies that your on-prem license is active.
* `us-docker.pkg.dev` on port 443: container image registry.
# Self-service licensing and credentials
## API key Generation
Refer to our [user interface dashboard](https://app.rime.ai) to generate the necessary keys and credentials for authenticating and authorizing the deployment and use of our services.
# Deployment
The deployment consists of two services, each powered by a container image:
* **API service:** responsible for handling the HTTP and WebSocket requests, and for verifying the license. It serves as a proxy to the TTS service.
* **TTS service:** responsible for model inference.
There is a 1:1 relationship between the API service and the TTS service: for each TTS model, you will need a corresponding API service. Multiple pairs of API and TTS services can be deployed on the same machine.
## Artifact Registry login
Key file to be provided by Rime.
```bash Log in to Artifact Registry theme={null}
cat KEY-FILE | docker login -u _json_key --password-stdin https://us-docker.pkg.dev
```
## Container images
### TTS service
#### Arcana
The Arcana images can be found at `us-docker.pkg.dev/rime-labs/arcana/v2/:`.
* The support languages are: `en`, `es`, `fr`, `de`, `si`.
* The latest version is `20260420`.
#### Arcana v3 (multilingual)
The Arcana v3 images can be found at `us-docker.pkg.dev/rime-labs/arcana/v3/ennea:`.
* The support languages are: `en`, `es`, `fr`, `pt`, `de`, `ja`, `ta`, `si`, `he`.
* The latest version is `20260420`.
For Arcana only, you can also load the engine and data packages from different containers:
* `us-docker.pkg.dev/rime-labs/engine/arcana:`
* `us-docker.pkg.dev/rime-labs/package/arcana/:`
#### Coda (multilingual)
The Coda v1 images can be found at `us-docker.pkg.dev/rime-labs/coda/v1/coda:`.
* The support languages are: `en`, `es`, `fr`, `pt`, `de`, `ja`.
* The latest version is `20260517`.
#### Mist v3 (multilingual)
The Mist v3 images can be found at `us-docker.pkg.dev/rime-labs/mist/v3/omni:`
* The support languages are: `de`, `en`, `es`, `fr`.
* The latest version is `20260420`.
### API service
The latest image version is:
* `us-docker.pkg.dev/rime-labs/api/service:20260424`
## Docker Compose configuration
A simple way of deploying on a machine is to use Docker Compose.
Create a `compose.yml` file with your editor of choice to define the services and their configurations:
```yaml compose.yml theme={null}
version: '3.8'
services:
api:
image: us-docker.pkg.dev/rime-labs/api/service:
depends_on:
- model
ports:
- "8000:8000"
- "8002:8002" # binary websockets api
- "8003:8003" # json websockets api
restart: unless-stopped
environment:
- MODEL_URL=http://model:8080/invocations
model:
image: us-docker.pkg.dev/rime-labs///:
deploy:
resources:
reservations:
devices:
- driver: nvidia
capabilities: [gpu]
count: all
restart: unless-stopped
```
> When running on Kubernetes, ensure that `MODEL_URL` points to `http://0.0.0.0:8080/invocations` instead of the Docker Compose service name.
### Multi-model backend
If you want to serve multiple Arcana languages via a single API instance, you can create a `compose.yml` like the following:
```yaml compose.yml theme={null}
services:
en-api: us-docker.pkg.dev/rime-labs/api/service:
image:
depends_on:
- en-model
- es-model
ports:
- "8000:8000"
- "8001:8001"
- "8002:8002"
- "8003:8003"
restart: unless-stopped
environment:
- MODEL_URL=http://en-model:8080/invocations
- ARCANA_ENG_MODEL_URL=http://en-model:8080/invocations
- ARCANA_SPA_MODEL_URL=http://es-model:8080/invocations
en-model:
image: us-docker.pkg.dev/rime-labs/arcana/v2/en:
deploy:
resources:
reservations:
devices:
- driver: nvidia
capabilities: [gpu]
count: all
restart: unless-stopped
es-model:
image: us-docker.pkg.dev/rime-labs/arcana/v2/es:
deploy:
resources:
reservations:
devices:
- driver: nvidia
capabilities: [gpu]
count: all
restart: unless-stopped
```
Note that the `ARCANA_{LANG}_MODEL_URL` environment variable must point to the container running the Arcana image for that language,
but you should still point `MODEL_URL` to a default model container. The model environment variables currently supported are:
```
ARCANA_ENG_MODEL_URL
ARCANA_SPA_MODEL_URL
ARCANA_FRA_MODEL_URL
ARCANA_GER_MODEL_URL
```
The API will route to these model backends based on the request parameter lang.
### Authentication configuration
By default, callers must pass their Rime API key in every request via the `Authorization: Bearer ` header. Two additional environment variables let you configure authentication at the deployment level instead.
#### Pre-configuring the API key (`RIME_API_KEY`)
If you set `RIME_API_KEY`, the API service will use it to authenticate with the Rime license server automatically, and callers do not need to include an API key in their requests.
You can supply it as an environment variable:
```yaml compose.yml theme={null}
environment:
- MODEL_URL=http://model:8080/invocations
- RIME_API_KEY=
```
Or mount it as a secret file at `/secrets/rime_api_key` inside the container:
```yaml compose.yml theme={null}
services:
api:
image: us-docker.pkg.dev/rime-labs/api/service:
environment:
- MODEL_URL=http://model:8080/invocations
volumes:
- /run/secrets/rime_api_key:/secrets/rime_api_key:ro
```
When neither is provided, the per-request `Authorization` header pathway remains active as normal.
#### Alternate API key header (`API_KEY_HEADER`)
On platforms that intercept the `Authorization` header, set `API_KEY_HEADER` to the name of an alternate header that callers will use to pass their Rime API key:
```yaml compose.yml theme={null}
environment:
- MODEL_URL=http://model:8080/invocations
- API_KEY_HEADER=x-my-platform-rime-api-key
```
Callers then authenticate with:
```bash theme={null}
curl -H "x-my-platform-rime-api-key: " ...
```
#### Platform API key (`PLATFORM_API_KEY`)
On platforms that require authenticated inter-container requests, set `PLATFORM_API_KEY` so the API service can reach the model backend. It can also be mounted as a secret at `/secrets/platform_api_key`:
```yaml compose.yml theme={null}
environment:
- MODEL_URL=http://model:8080/invocations
- PLATFORM_API_KEY=
```
### Start Docker Compose
```bash Start Docker Compose theme={null}
docker compose up -d
```
## Deployment steps
1. **Environment setup:** Prepare your AWS environment according to the specifications required for optimal deployment.
2. **Service deployment:** Using Docker, deploy the images on your server.
3. **Networking setup:** Configure the network settings, including the Internet Gateway and port settings, to ensure connectivity and security.
4. **Licensing and authentication:** Generate and apply the necessary API key via our dashboard to start using the services.
> **Note:** Once the containers are started, expect a five-minute delay for warm-up before sending the first TTS requests.
## Additional information
* **Troubleshooting guide:** A troubleshooting guide will be provided to help resolve common issues during deployment.
* **Available voices and models:** All voices are currently available.
# Requests and response formats
## HTTP requests
**Request:**
```bash Health check theme={null}
curl http://localhost:8000/health
```
This should return:
```json theme={null}
{
"apiStatus":"ok",
"timestamp":timestamp,
"licenseStatus":"valid"/"expired-or-not-set",
"modelReachable":true/false
}
```
```bash Request example theme={null}
curl -X POST "http://localhost:8000" -H "Authorization: Bearer -H "Content-Type: application/json" -d '{
"text": "I would love to have a conversation with you. The new model is out.",
"speaker": "joy",
"modelId": "mist"
}' -o result_mist.txt
```
**Response:**
```json Response format theme={null}
{"audioContent":{"model_output":""}}
```
Sample response file: [`result.txt`](https://drive.google.com/file/d/1GW2D8pm5witYMQdKQrPvp_OW5PM0TxNj/view?usp=drive_link)
## Receiving a response in MP3 format
**Request:**
```bash Request example theme={null}
curl -X POST "http://localhost:8000" -H "Authorization: Bearer " -H "Content-Type: application/json" -H "Accept: audio/mpeg" -d '{
"text": "I would love to have a conversation with you.",
"speaker": "joy",
"modelId": "mist"
}' -o result.mp3
```
**Response:**
Sample response file: [`result.mp3`](https://drive.google.com/file/d/1iwmWB1byBXknmNvNmvB_SgBpvnU4bChJ/view?usp=sharing)
### Receiving a response in PCM (raw) format
**Request:**
```bash Request example theme={null}
curl -X POST "http://localhost:8000" -H "Authorization: Bearer " -H "Content-Type: application/json" -H "Accept: audio/L16" -d '{
"text": "I would love to have a conversation with you.",
"speaker": "joy",
"modelId": "mist"
}' -o result.pcm
```
**Response:**
Sample response file: [`result.pcm`](https://drive.google.com/file/d/1pwkGW9jCe1TN9GF5yQa6j619vc8WfjGu/view?usp=drive_link)
### WebSocket endpoints
#### JSON websockets
The JSON WebSocket endpoint compatible with both `arcana` models as well as `mist` will be served at port `8003`. For example, `ws://localhost:8003`, which will be equivalent to our \[cloud websockets-json API.
See the [arcana json websockets docs](/api-reference/arcana/websockets-json) and the [mist json websockets docs](/api-reference/endpoint/websockets-json) depending
on which model backend you have configured.
#### Non-JSON websockets
The non-JSON WebSocket endpoint will be served at port `8002`. For example, `ws://localhost:8002`, which will be equivalent to our [cloud websockets-json API](/api-reference/endpoint/websockets-json).
\`
#### Deprecated
A **deprecated** websockets endpoint will be served on port `8001` that is **only** compatible with the mist model lines, and is equivalent to our [cloud websockets-json API](/api-reference/endpoint/websockets-json).